How to Effortlessly Publish Notion Articles Directly to Webflow CMS
In today's fast-paced digital era, efficiency is king. As content creators and managers, seamless workflows are crucial, especially when dealing with versatile platforms like Notion and Webflow. Imagine writing your articles directly in Notion and publishing them with ease on your Webflow site. This is now possible with SyncFlow, a revolutionary tool designed to enhance your productivity by enabling a seamless sync between Notion and Webflow.
Why Use SyncFlow?
SyncFlow bridges the gap between Notion and Webflow, two of the most powerful tools for content management and web design. By synchronizing your Notion pages with your Webflow CMS, you save significant time, reduce manual errors, and streamline your content workflow. Here's why SyncFlow is an essential tool:
- Automated Workflow: It allows automatic synchronization of data whenever changes occur in Notion, ensuring your Webflow site remains up-to-date without manual intervention.
- Seamless Styling: Import Notion elements with inline styling or classes, maintaining your design principles in Webflow.
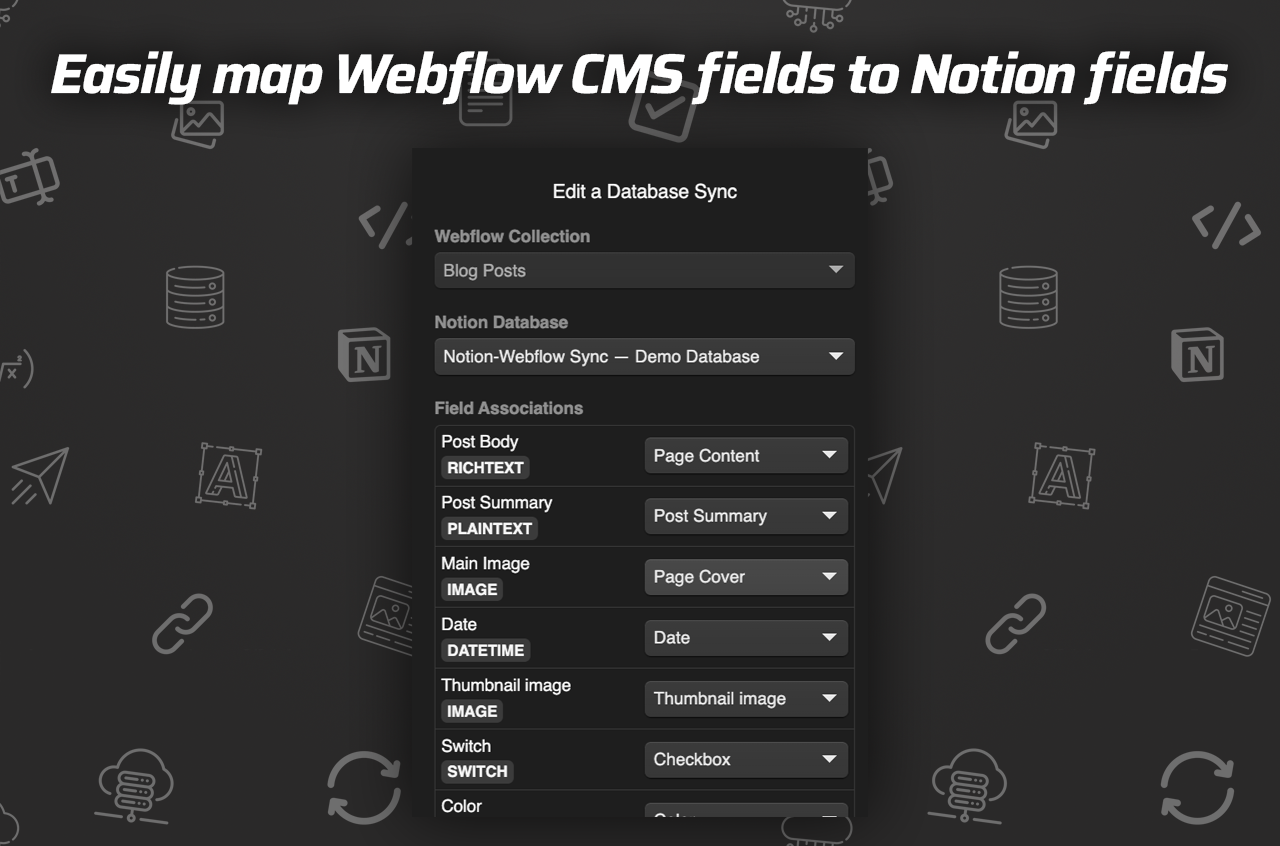
- Versatile Field Support: Supports rich text, images, checkboxes, dates, and more, allowing a comprehensive content transfer.
Step-by-Step Guide to Sync Notion with Webflow
Follow these simple steps to sync your Notion articles effortlessly to your Webflow CMS using SyncFlow.
1. Visit SyncFlow Website
Start by visiting SyncFlow's website and click on 'Get Started'.
2. Grant Access
Approve and allow SyncFlow access to your Webflow sites. This step is essential to facilitate the connection and synchronization between the platforms.
3. Account Setup
Sign up for a new SyncFlow account or log in if you already have one.
4. Connect Webflow and Notion
- Launch SyncFlow in Webflow: Open the Webflow designer, then initiate the SyncFlow app.
- Connect Notion: Click on 'Connect Notion' in SyncFlow and select the Notion page or folder you wish to sync.
5. Create a Sync Task
Select 'Sync a new database' within SyncFlow to initiate the sync process.
6. Select Webflow Collection
Choose the Webflow collection with which you'd like to sync your Notion database.
7. Set Up Notion Database
Select an existing Notion database or create a new one. If new, SyncFlow automatically sets up the necessary fields.
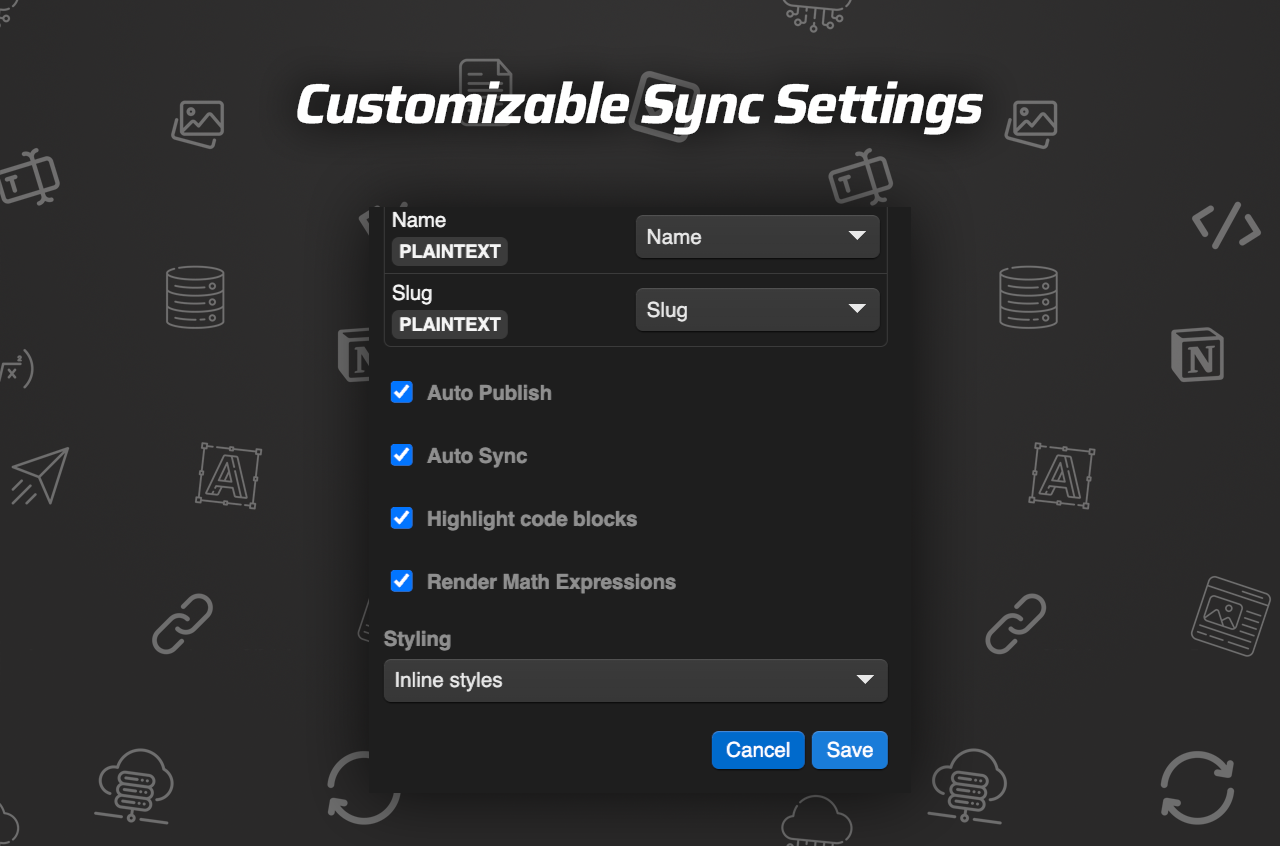
8. Adjust Sync Settings
Configure sync settings such as 'Auto-Publish', 'Auto-Sync', and preferences for code block and mathematical expression rendering.
9. Choose Styling Option
Decide between 'Inline Styles' for direct styling or 'Use Classes' for customization within Webflow, allowing more design flexibility.
10. Save Settings and Verify
Save your SyncFlow settings. Then, add a new entry in Notion and verify its synchronization in Webflow.
11. Check Webflow CMS
After a few moments, view the synchronized content in your Webflow CMS collection.
12. Full Resync Option
Utilize the full-resync function to update your entire Webflow collection in alignment with the Notion database when needed.
Video Resources
For a visual guide, check out the following helpful videos:
Why SyncFlow is the Future of Content Management
SyncFlow not only simplifies your workflow but also enhances your capabilities as a content creator or manager, ensuring your web presence is current and consistent. Whether you're a blogger, a company running multiple websites, or an educator maintaining academic content, SyncFlow transforms the way you manage and publish content.
Start using SyncFlow today and redefine your content management strategy! For more details, visit the official SyncFlow Website.


Comments
Post a Comment